TABLE OF CONTENTS
- 1. Overview
- 2. Navigating Inspect Data
- 3. Access & permissions
- 4. Viewing & paging records
- 9. Adding new records
- 10. Downloading data
- 11. Exclude Order / Exclude Order Line
- 12. Forecast Lock & Data Maintenance
1. Overview
Inspect Data is the screen where business users can browse, search, and (where allowed) directly edit the raw data that powers planning — master data like Products and Locations, transactional data like Sales Orders, loaded measures like Unit Price, and more — all without needing to go back to source files.
Every Inspect Data screen is built from the same underlying table grid, so once you learn how one entity works, you already know how to use all of them. This guide intentionally does not walk through every individual entity — instead it covers:
- How the left-hand navigation organizes entities into categories
- The common toolbar, sorting, filtering, editing, and saving behavior every screen shares
- Special-purpose actions that only appear for certain entities or tenant configurations — specifically Exclude Order / Exclude Order Line and Forecast Lock (Data Maintenance)
2. Navigating Inspect Data
Inspect Data is reached from the building icon in the left-hand navigation rail. Clicking it opens a flyout menu listing every data entity you have access to, automatically grouped into five fixed categories:
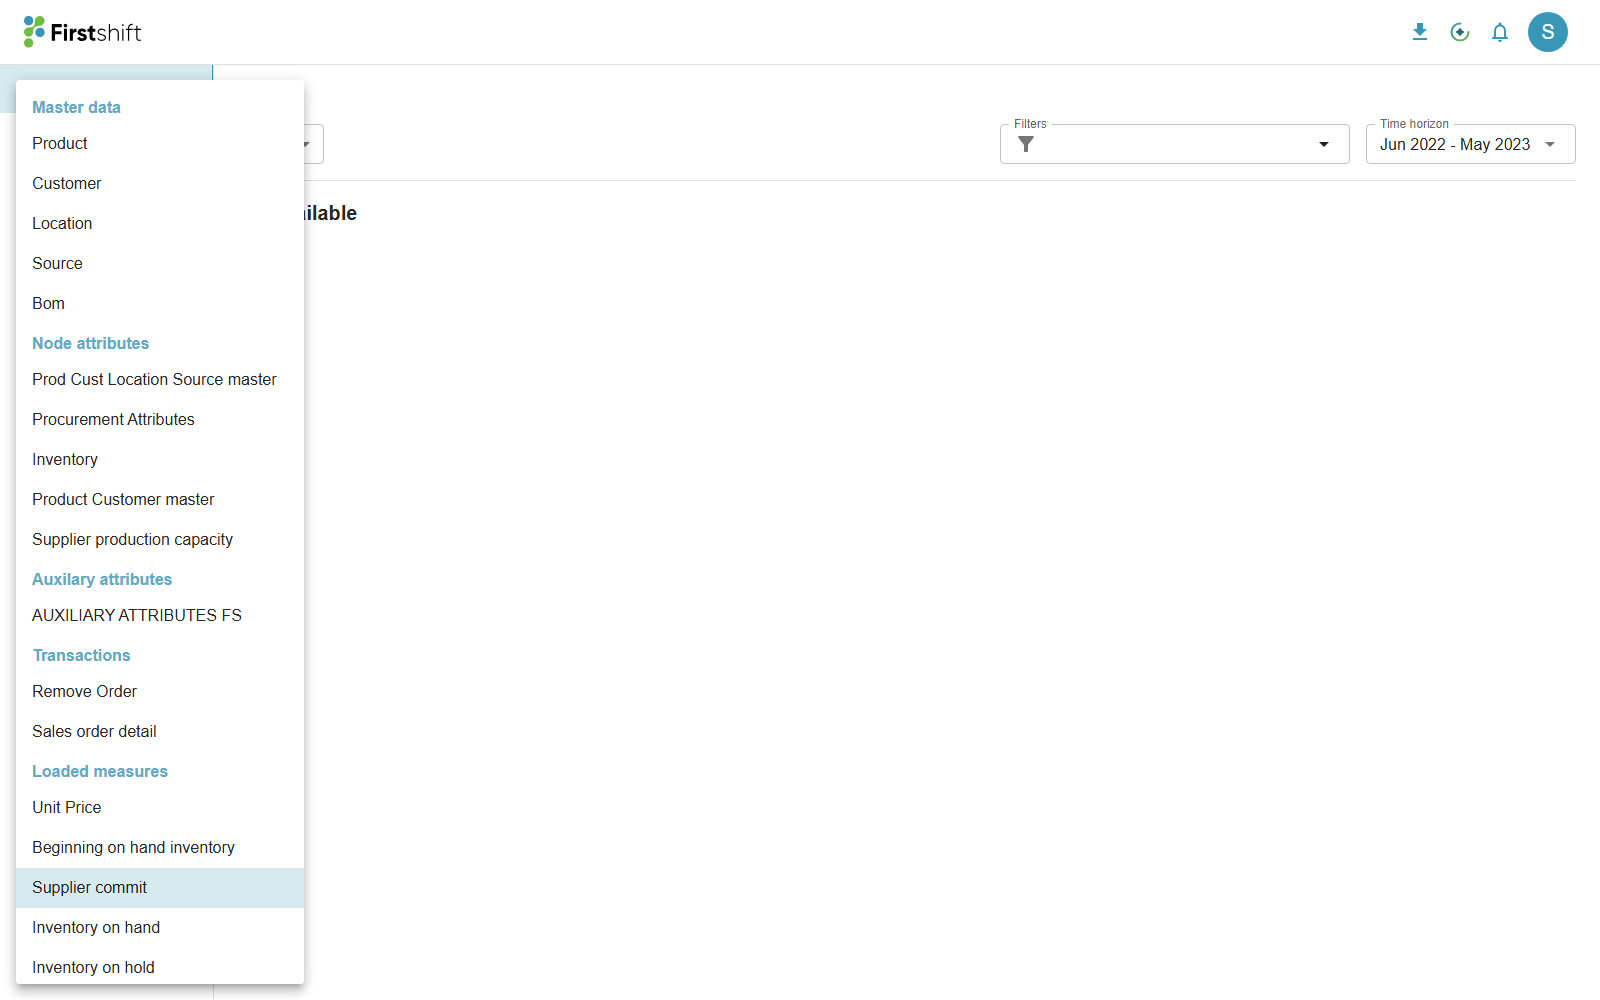 Screenshot 1 — The Inspect Data flyout menu, grouped into Master data, Node attributes, Auxiliary attributes, Transactions, and Loaded measures.
| Category | What lives here |
|---|---|
| Master data | The core master data dimensions that are key for your supply chain planning — e.g. Product, Customer, Location, Source, BOM. |
| Node attributes | Data describing a combination of two or more dimensions — e.g. a Product‑Customer Master, Product‑Location Master, Product‑Source master, etc. |
| Auxilary attributes | Supplementary lookup/reference data that doesn't fit the master or transactional model. For example: Pin Code, Store Data, etc. |
| Transactions | All transaction entities such as Sales Orders, Purchase Orders, Production Orders, Receipts, Stock-Transfer orders, etc. are part of this category.
|
| Loaded measures | Numeric measures imported from your source files that aren't tied to a specific transaction. E.g. On-Hand Inventory, Supplier Commit. |
| Unit of measure | This section contains two entities.
|
| Currency exchange | This entity is used to upload the currency exchange rates for each planning period (Month/Week) |
Drilling into a single record
Clicking a transaction's primary key link (e.g. a Sales Order ID) opens a dedicated detail view showing that record's header information plus its line-level detail in a nested grid. This detail view is reached only by clicking through from a grid — it does not have its own nav entry.
3. Access & permissions
Visibility into Inspect Data is controlled at the category level, not per individual entity. Your role is granted View access to one or more of the five categories above (Transactions, Master data, and so on); once you can see a category, every entity inside it is visible.
- Whether a column is editable is determined by that column's own configuration — not by your role. If a field is editable for your company's setup, any user with access to that screen can edit it.
- The "Add records" button is likewise controlled by the entity's configuration, not by a separate create-permission.Tip If a category or entity you expect to see is missing entirely, that's a permissions question for your administrator — but if a category is visible and a specific field simply can't be edited, that's expected behavior for that entity's configuration, not a permissions issue.
4. Viewing & paging records
Every Inspect Data grid loads records from the server a page at a time — nothing is downloaded to your browser until you ask for it. Controls at the bottom of the grid let you:
- Change Rows per page (10 / 50 / 100 / 500 / 1000, depending on the screen)
- Move to the next/previous page
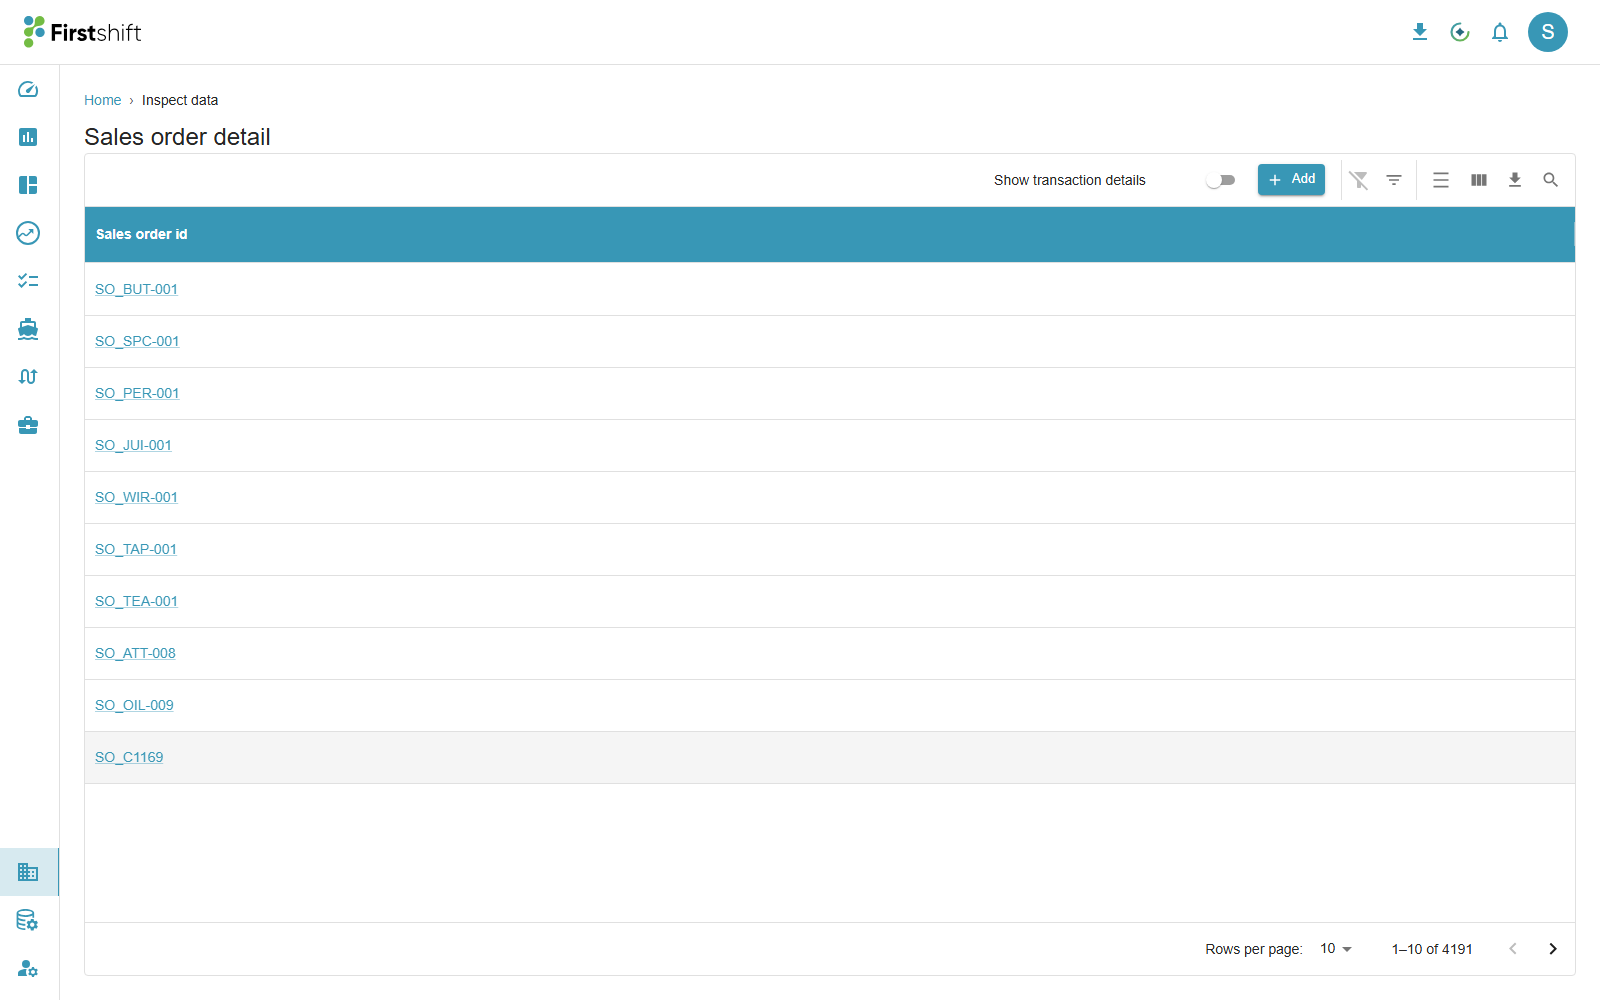
The record count shown (e.g. "1–10 of 4,191") always reflects your current filters and search — it updates live as you narrow the view down.
5. Sorting columns
Click any column header to sort by that column; click again to reverse the sort direction, and a third click clears it. Sorting is applied on the server, so it always reflects the full dataset — not just the rows currently loaded on screen.
6. Filtering & search
Two independent ways to narrow down a grid are available side by side, and can be combined:
Column filters
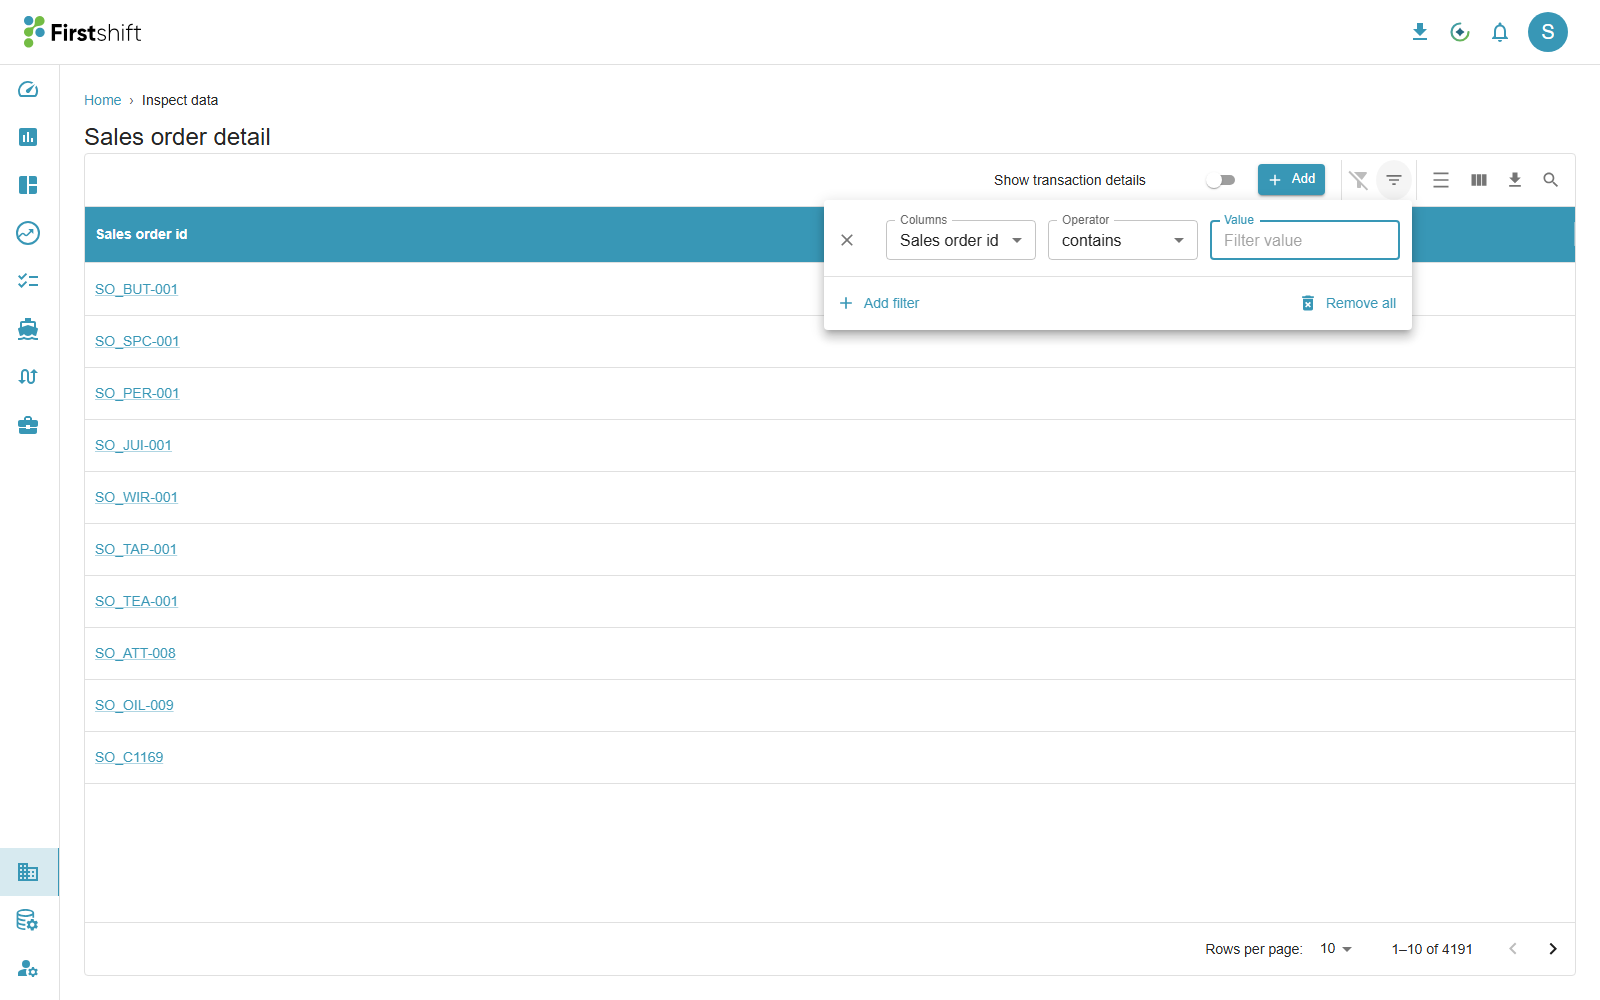
Click the funnel/Filters icon in the toolbar to open the filter builder. Choose a column, an operator (contains, equals, greater than, etc. — the choices adapt to the column's data type: text, number, or date), and a value. Use + Add filter to stack multiple conditions, or Remove all to clear them.
Quick search
The magnifying-glass icon expands into a free-text search box that looks across all visible columns at once. A column filter and a quick search can be active together. This works like records must match the specific filter and contain the search text somewhere.
The small funnel icon (separate from the Filters panel) clears every active column filter in one click, and shows a count badge while any filter is active.
7. Column layout & personalization
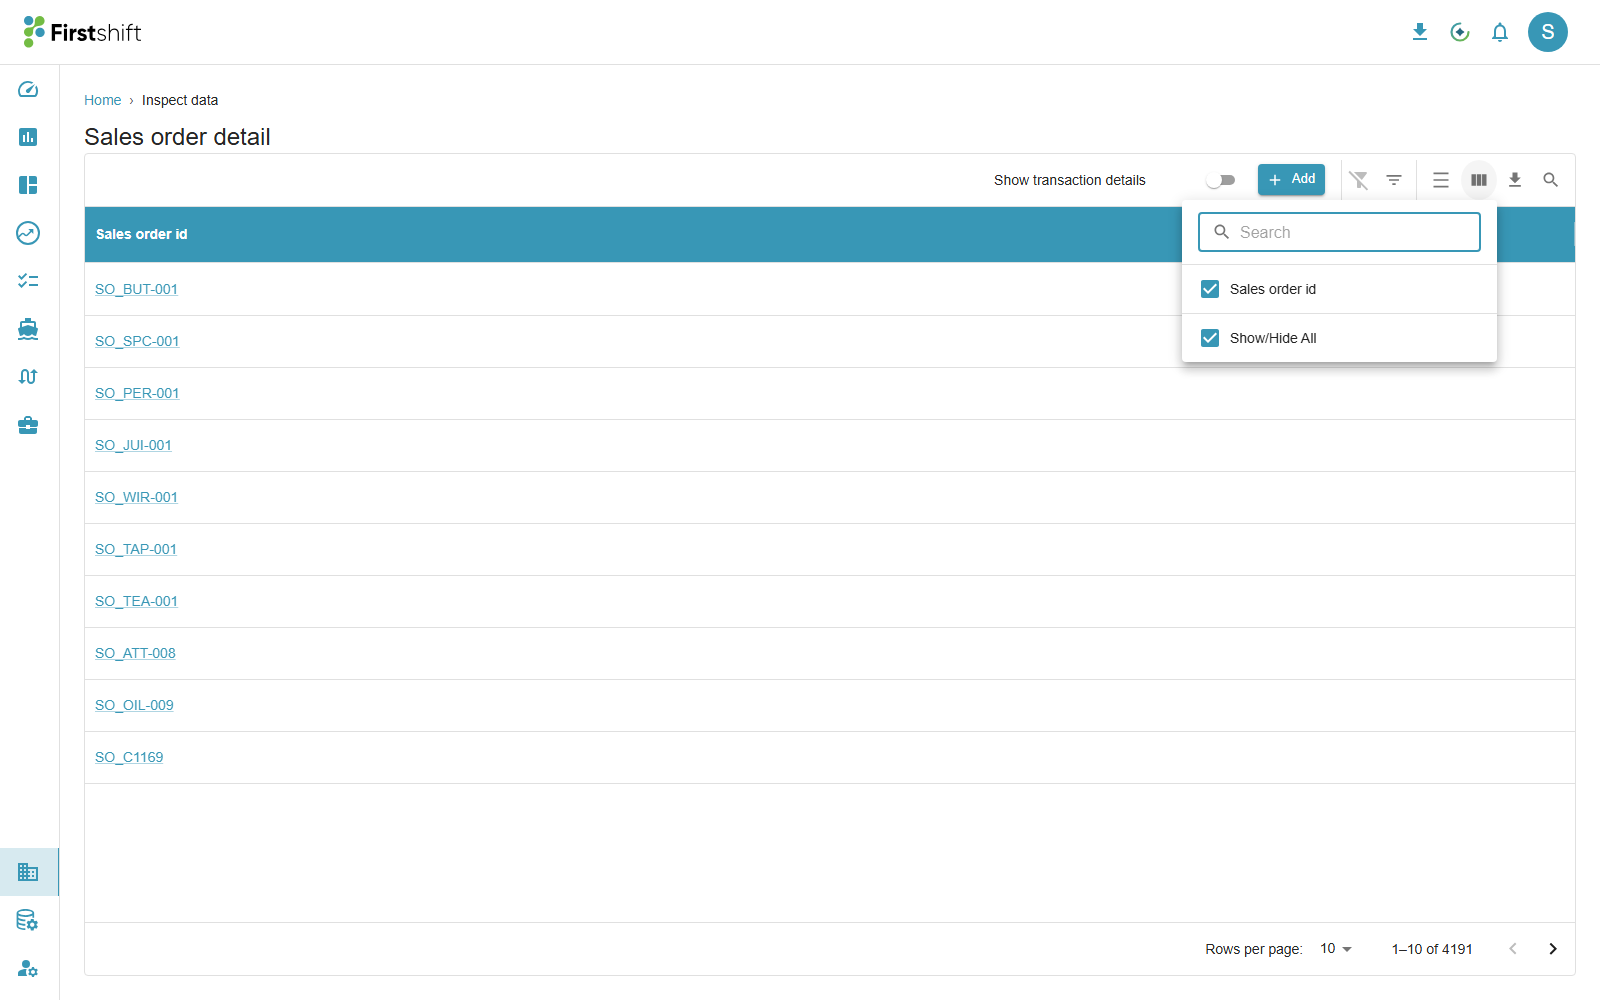
Every Inspect Data table allows you to select which columns you see and how they're arranged. The application also automatically stores the user choices in the user preferences so that the next time you open that same screen, the application renders the data accordingly.
| Control | What it does |
|---|---|
| Columns panel | Show or hide individual columns, or use "Show/Hide All." |
| Drag a column header | Reorder columns. |
| Pin (via column menu) | Freeze a column to the left edge so it stays visible while scrolling horizontally. |
| Density selector | Switch row height between Compact, Standard, and Comfortable. |
This is per-user, per-entity state: your column visibility, order, pinning, density, and any active filter are saved to your account and restored automatically when you come back — they are not shared with other users and don't affect what anyone else sees.
8. Editing & saving records
Where a column has been configured as editable, you can change its value directly in the grid:
- Click Edit in the toolbar to enter edit mode (a plain double-click on a cell is not enough on its own). The grid must be in Edit mode first, except for a few special columns noted below.
- Click into any editable cell and type the new value, or use the field's own control. For example, a date column opens a calendar picker, a dropdown-backed column shows a searchable list, and so on.
- Click Save to commit every change you've made, or Cancel to discard them all and revert.
Per-row undo and validation
- On grids with a detail/line view, any row you've edited shows an undo icon that reverts just that one row without discarding your other changes.
- Certain business-critical fields (for example, a required quantity or a required date) are validated as you type. An invalid or missing value is highlighted in red. The Save button will be blocked until these errors are corrected.
9. Adding new records
Where supported, the + Add button opens a form for creating one or more new records without leaving the grid.
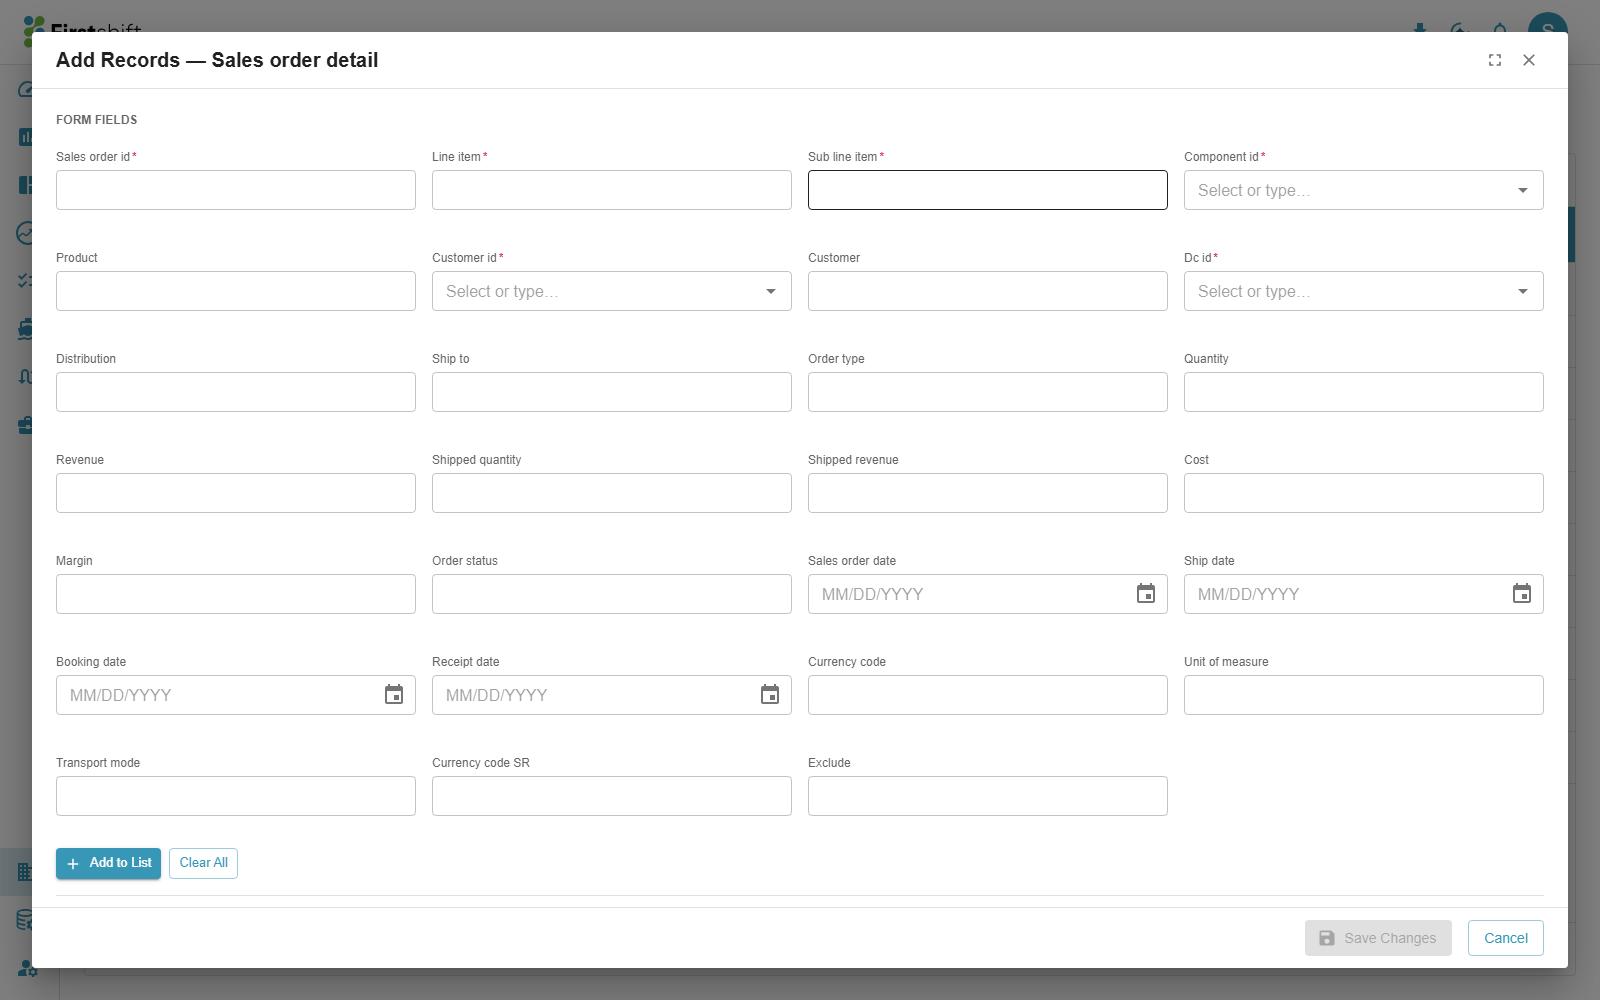
- Required fields are marked with an asterisk and must be filled before the record can be added to the list.
- Key/reference fields (like a Product or Customer ID) often auto-fill their paired description field once you pick a value. You don't have to type the description yourself. Similarly, if the description field is provided, the application automatically selects IDs.
- Use Add to List to add a record to the temporary list. This action also runs a duplicate check against your existing data, so you can't accidentally create the same record twice.
- You can add as many records as you like to the temporary table. You can also edit or remove any of them from this temporary table list. Once done, click Save Changes to submit all of these new records to the database.
- New records aren't necessarily visible the instant you save. The application creates a dataload job even for the records created from the UI. This is similar to the same background data-load process as a file upload. You can track the dataload process for these newly created records in the Dataload history.
10. Downloading data
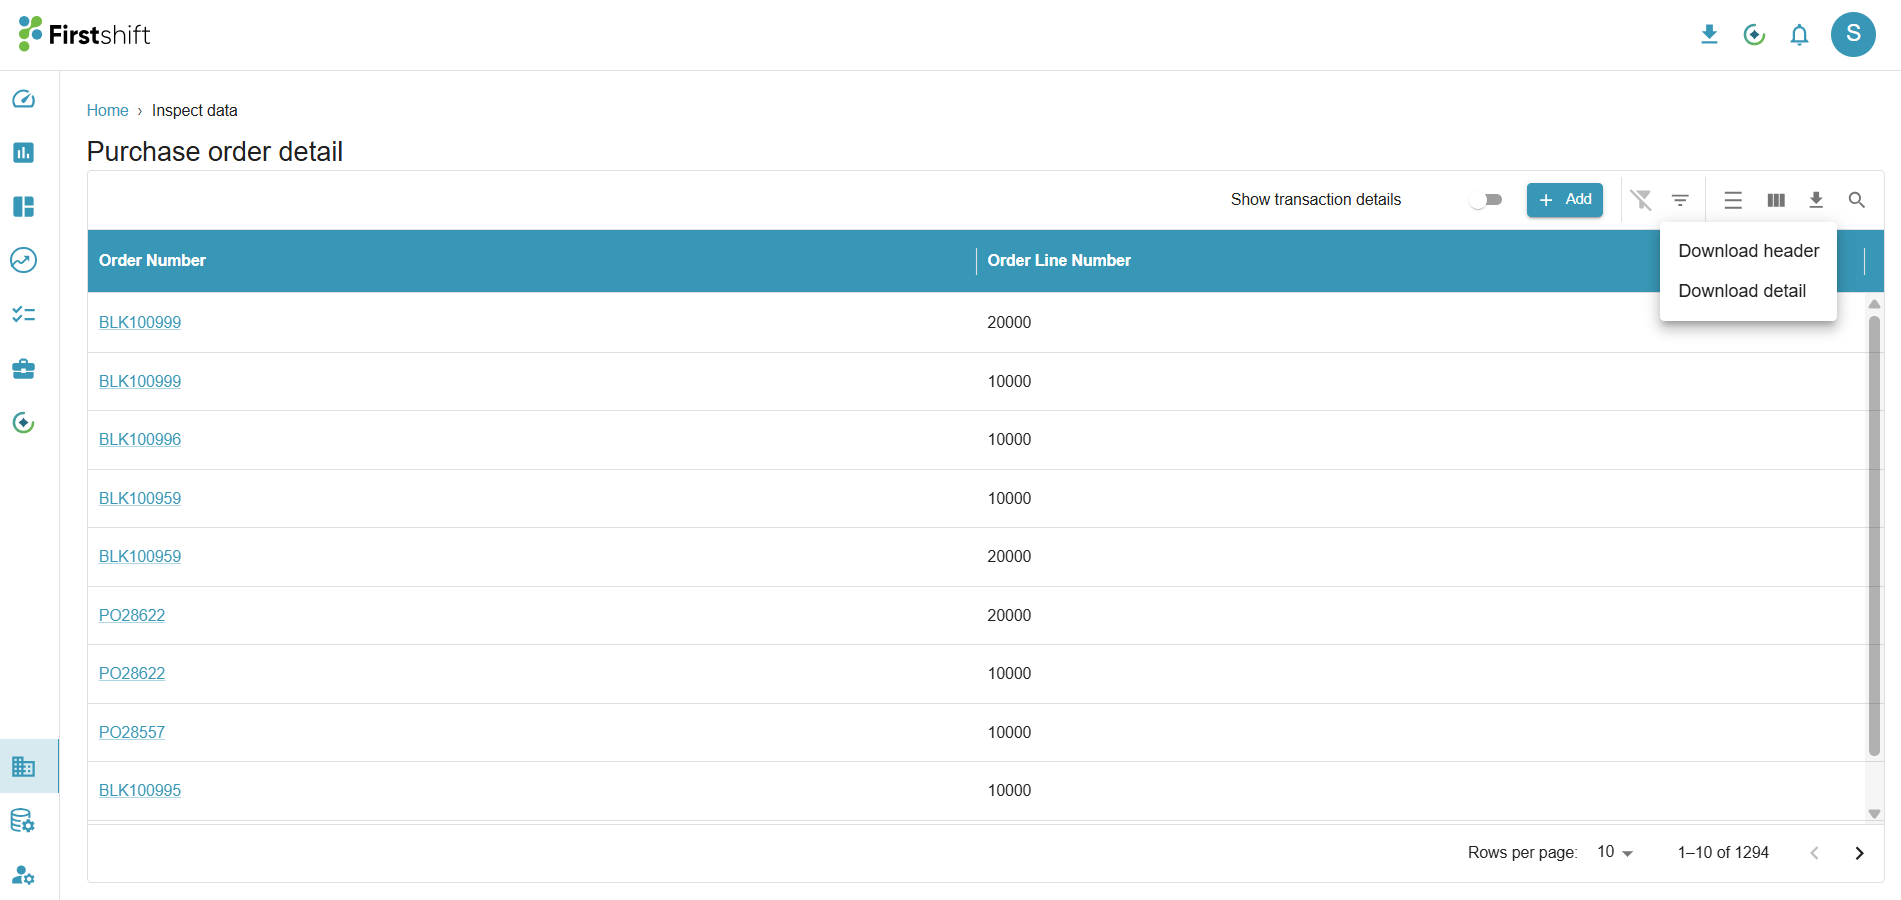
The download icon exports the current grid to a file. On entities with both a header and a detail/line view, clicking it opens a small menu letting you choose Download header or Download detail independently. The export always respects your current column visibility — hidden columns aren't included.
11. Exclude Order / Exclude Order Line
On transaction-type entities (orders and similar event data) that have this capability turned on for your company, Inspect Data lets you exclude specific orders or order lines from being counted in forecasting and planning calculations — without deleting the underlying record.
How to use it
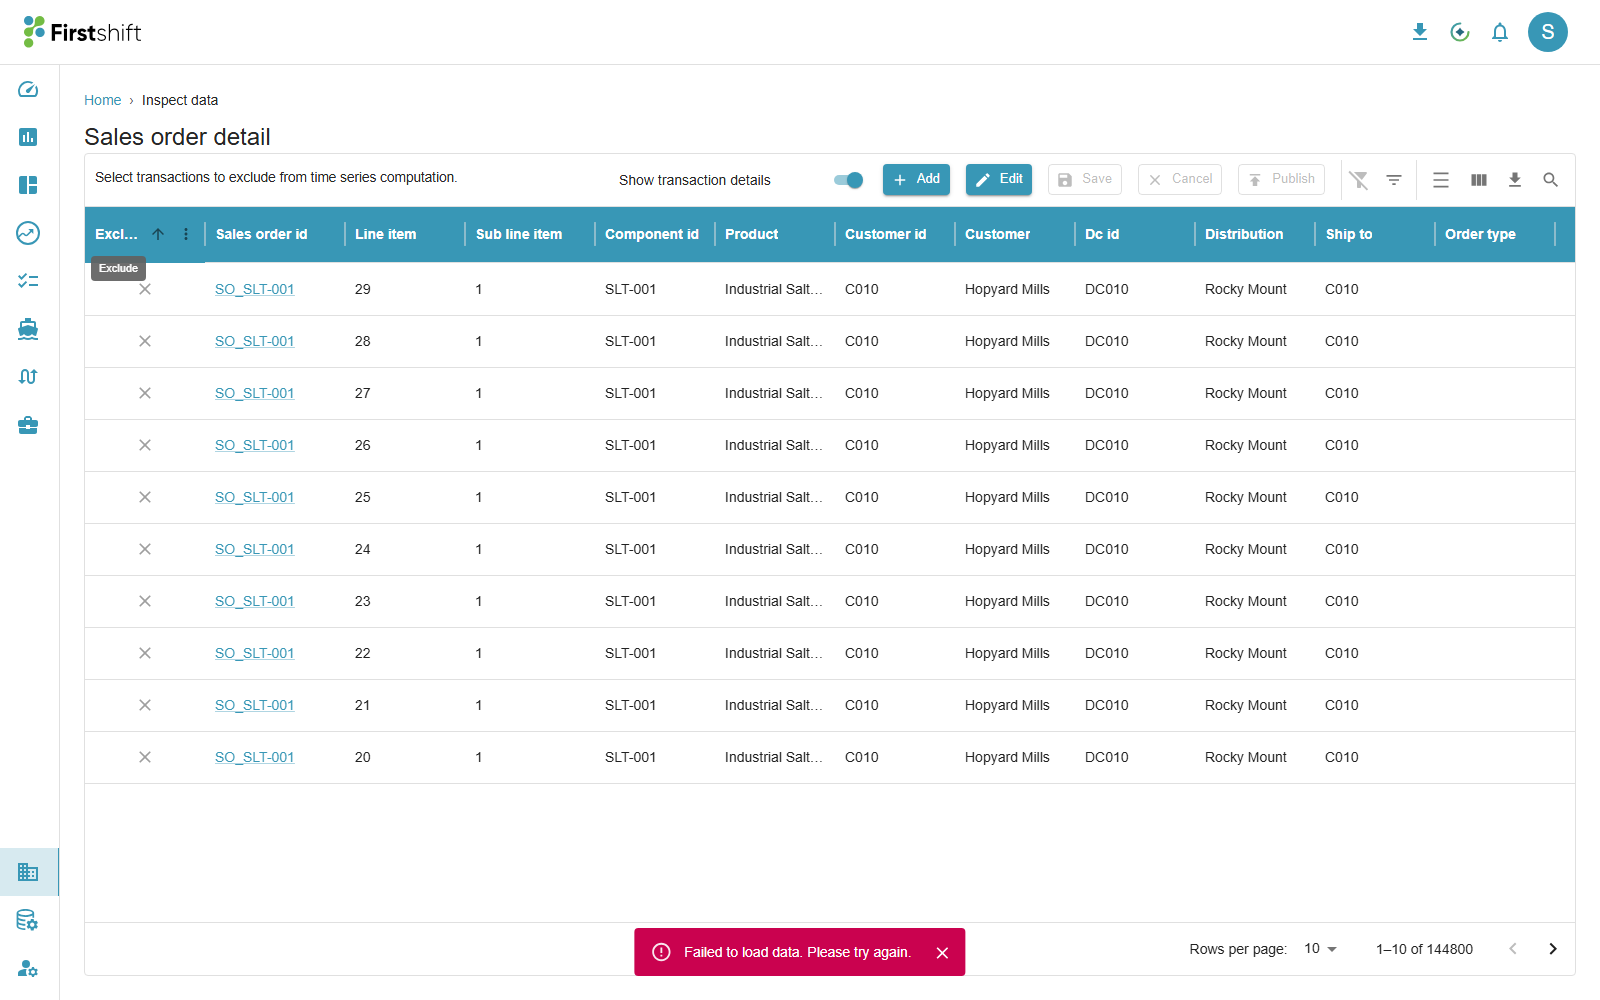
- Turn on Show transaction details in the toolbar. The grid switches from order headers to individual order lines, and a helper message appears: "Select transactions to exclude from time series computation."
- Click Edit, then check the Exclude box on any line(s) you want removed from downstream calculations (uncheck to bring a previously excluded line back in).
- Click Save to record your selections.
- Click Publish to apply them. You'll be asked to confirm: "This action will recompute the transaction measures by excluding the selected records. Please make all the changes before you Publish."
What "Exclude" actually does
Publishing an exclusion change kicks off a background measure recalculation: the excluded line's quantity/value is subtracted from the historical figures that forecasting and planning read as demand history. Un-excluding a line adds it back in the same way. The original transaction record itself is never deleted. This action only affects whether it's counted going forward.
Order-level vs. line-level
"Exclude Order" and "Exclude Order Line" are the same underlying capability applied at different levels of detail:
- To exclude a complete order, select all the order lines within the order no.
- On the line-level view (after turning on "Show transaction details"), checking Exclude removes just that specific line (or sub-line, for entities with that level of granularity) while leaving the rest of the order intact.
12. Forecast Lock & Data Maintenance
Forecast Lock is a company-wide setting (configured by an administrator) that designates one master-data level — for example Product — as the level at which forecast generation can be manually overridden. When it's enabled, a Data Maintenance mode becomes available on that entity's Inspect Data screen.
How to use it
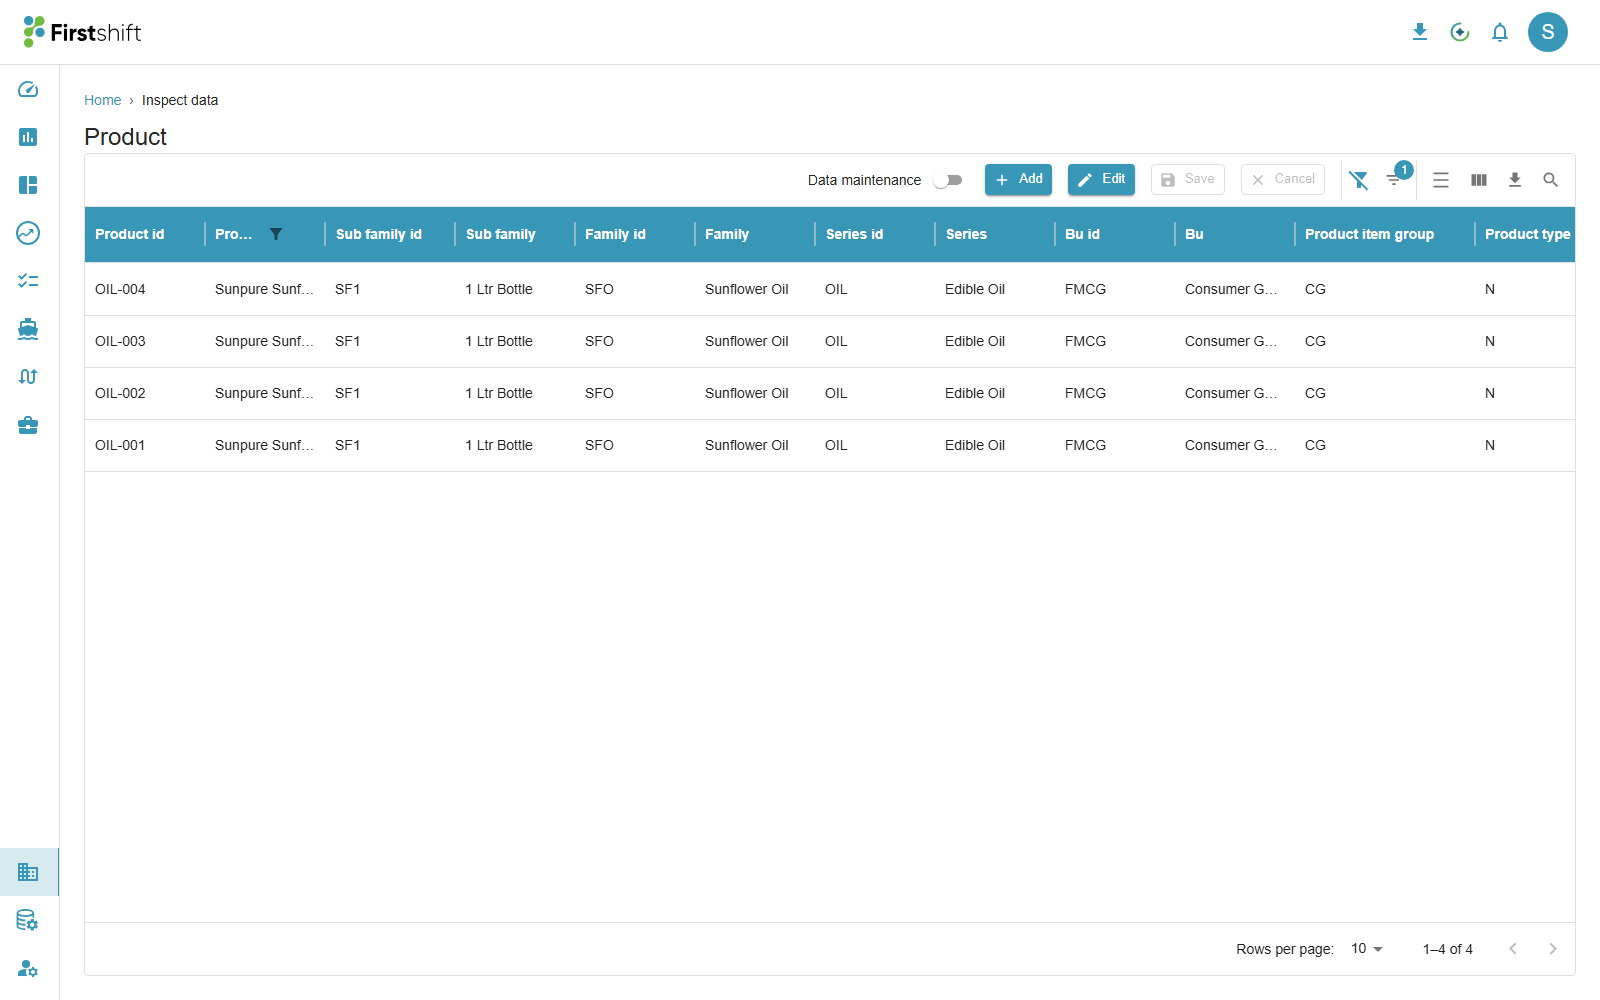
- Turn on the Data maintenance switch (tooltip: "Enable data maintenance mode to manage forecast disallow settings"). The grid switches into a single-purpose editing mode.
- A Turn off forecast checkbox column appears. While Data Maintenance mode is on, this is the only column you can edit — every other field becomes read-only for the duration, to keep this mode focused on one task.
- Check the box for any record that should be excluded from automatic forecast generation going forward; uncheck it to let forecasting resume for that record.
- Click Save to apply your changes.
- Refer to Pause/Disallow Forecast functionality here.
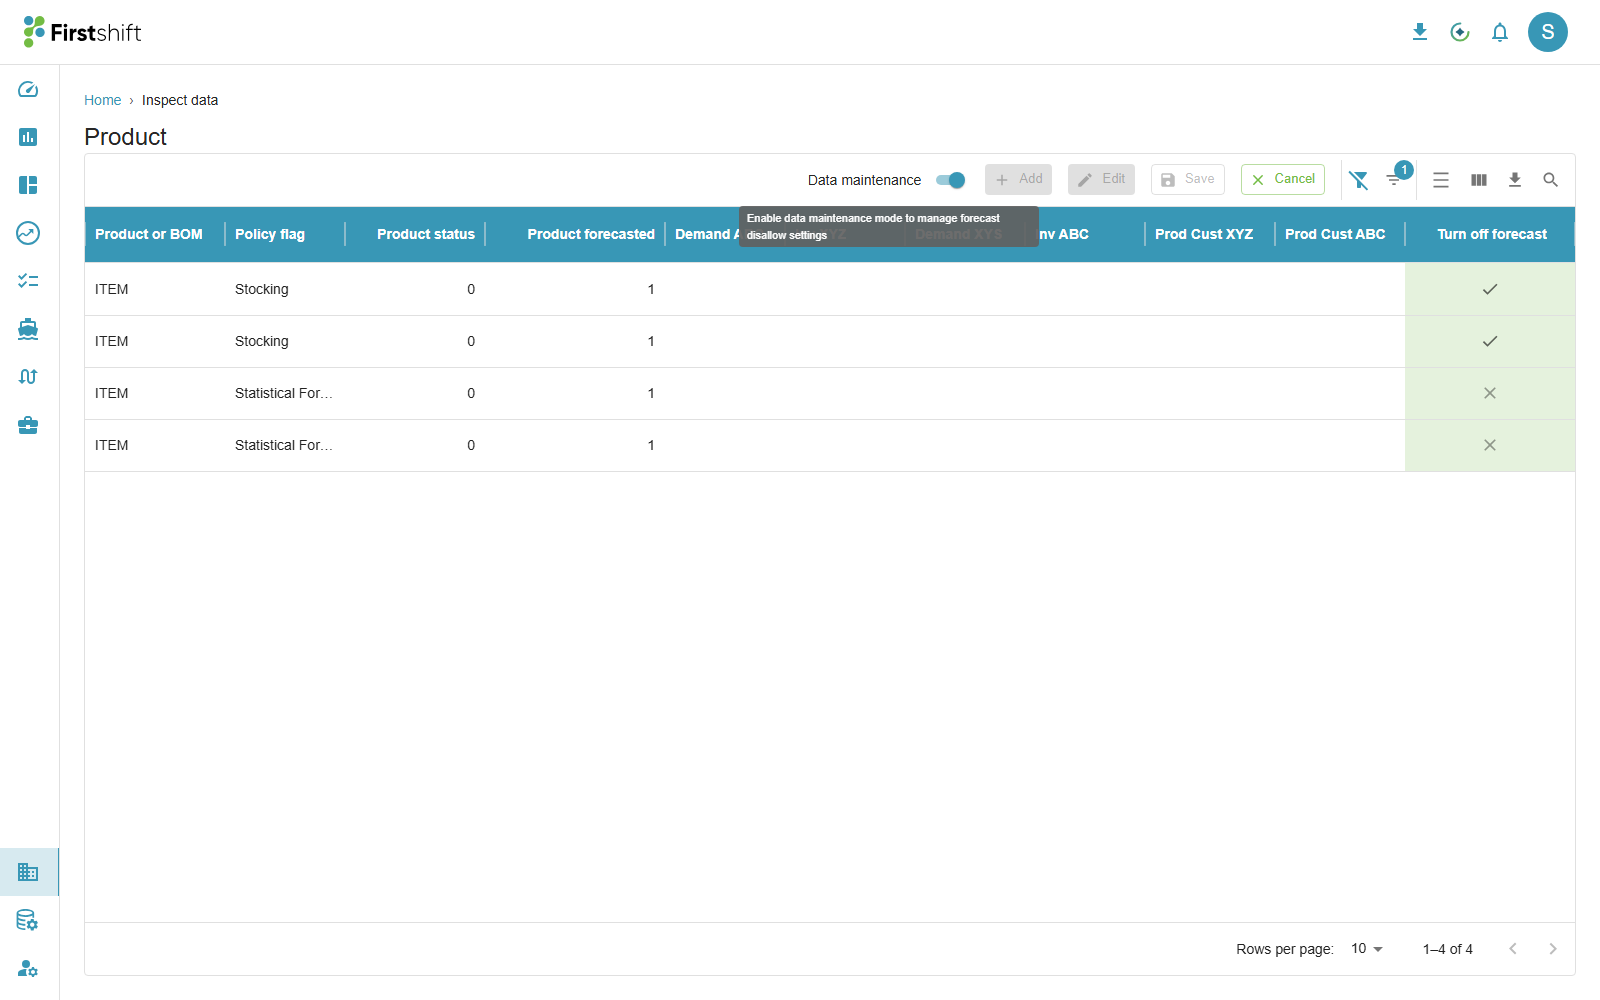
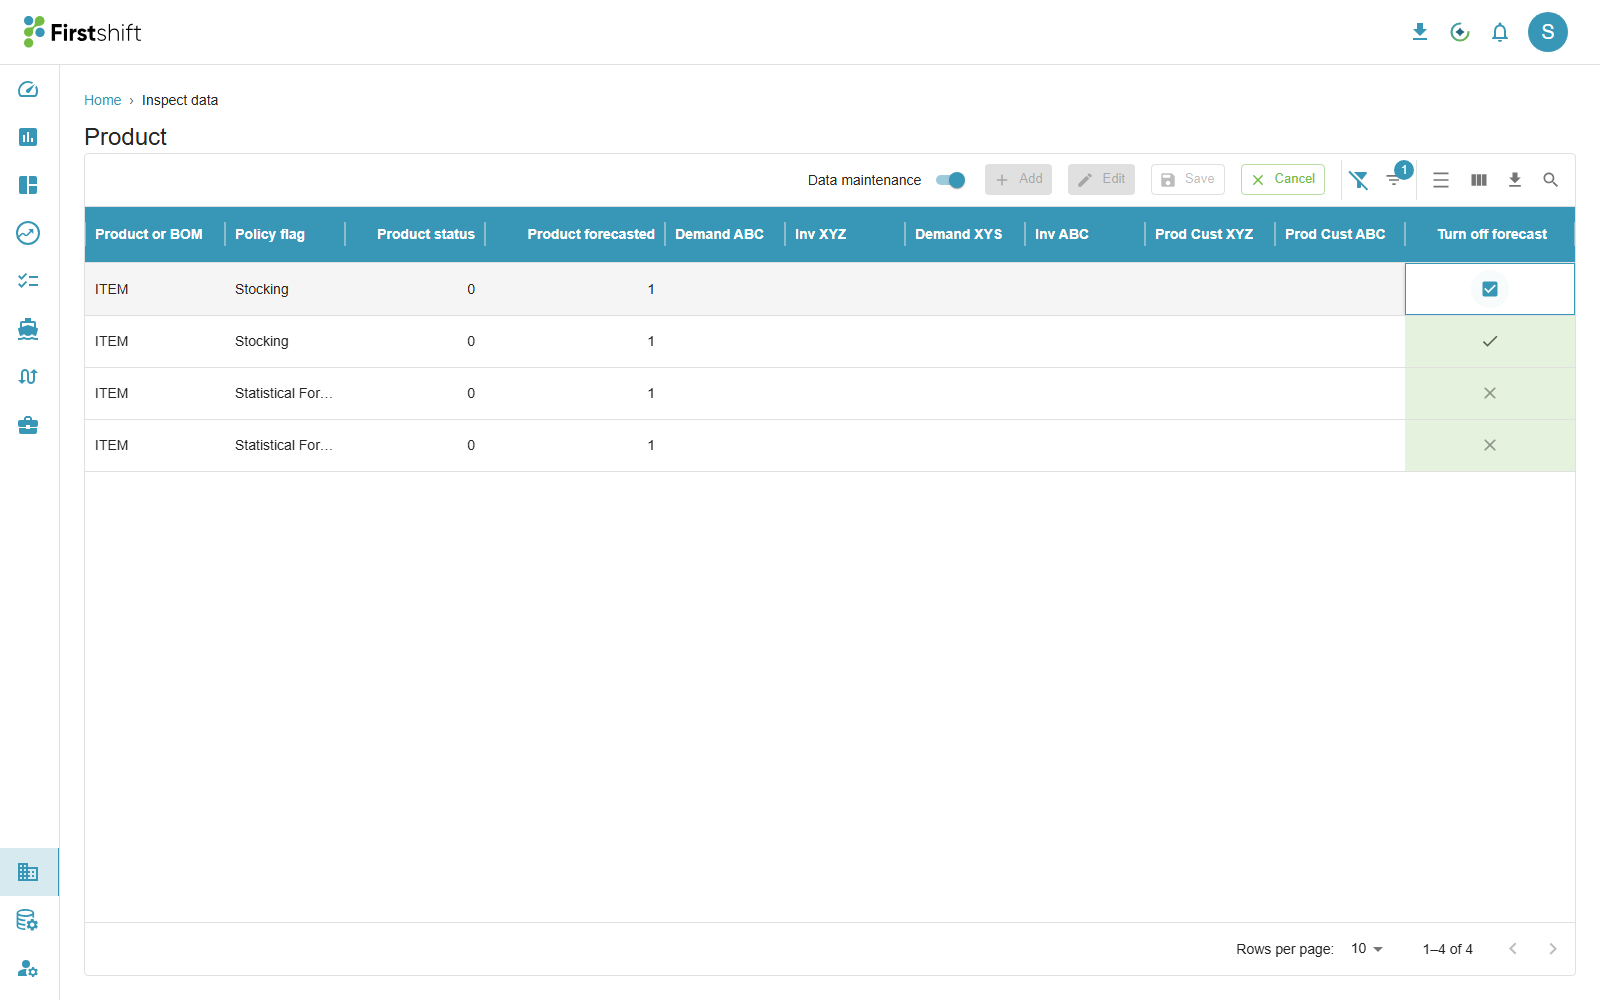
Checking this box for a record removes it from the pool of items that the statistical forecast engine generates numbers for. This is intended for cases where a demand planner needs to manually control the forecast for a specific product (or whichever level your company has configured) rather than rely on the system-generated number. For example, a discontinued item, or one undergoing a manual re-forecast.
- It will not appear on entities that weren't selected as the lock level.
- This setting can be applied only to one entity.
Was this article helpful?
That’s Great!
Thank you for your feedback
Sorry! We couldn't be helpful
Thank you for your feedback
Feedback sent
We appreciate your effort and will try to fix the article