TABLE OF CONTENTS
Overview
Forecast runs in Firstshift.AI help analyze forecasted units and revenue based on historical data. These runs generate statistical forecast values, allowing users to evaluate predicted future revenue and unit demand for the selected items during forecast creation by leveraging historical data and statistical models.
Forecast navigation
To access Forecast Management, navigate to the left-side menu and select Forecast Management from the available options. This will open the forecast management module, where you can create, monitor, and analyze forecast jobs.

Forecast list screen
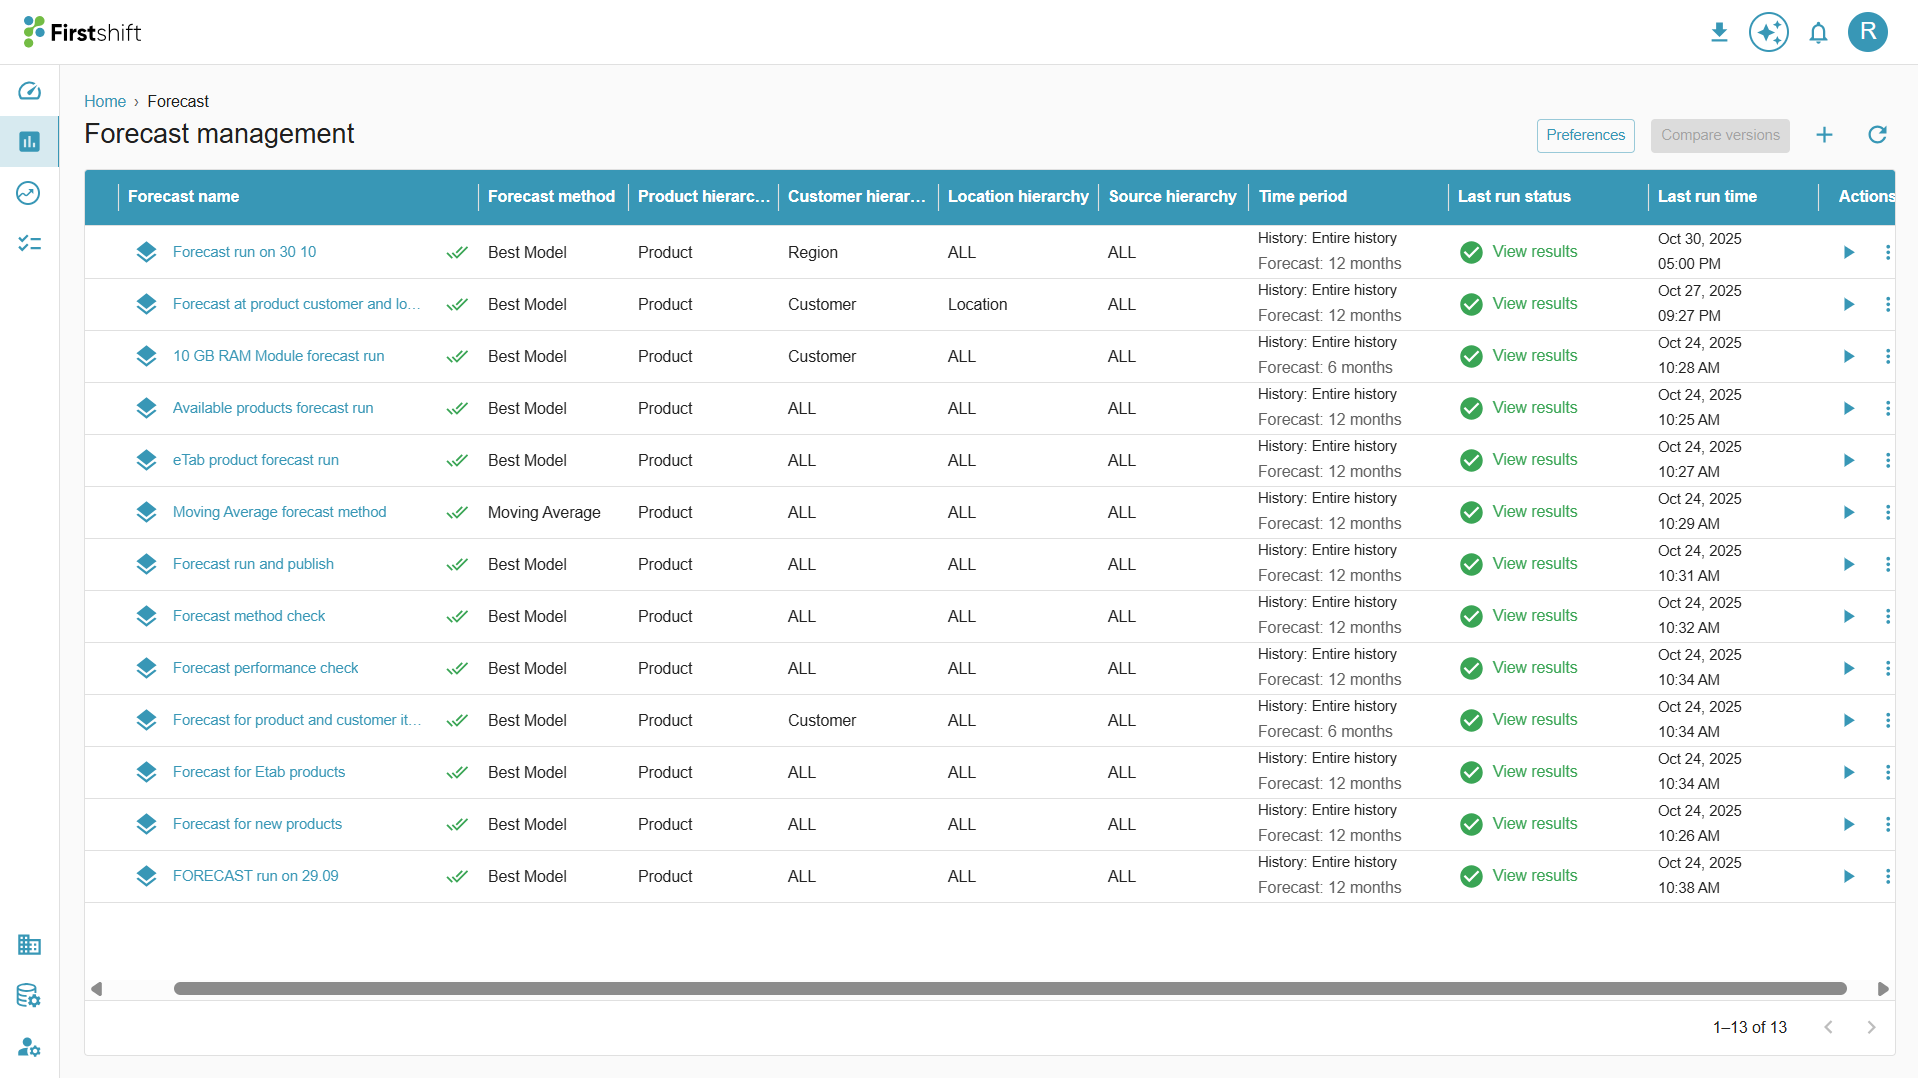
Forecast name: The Forecast Name refers to the name of the created forecast run. Clicking on the name will open the results page, where you can view and analyze the details. The results can be accessed both in multi-item view and single-item view.
Published Forecasts and Forecast Scenarios: Published forecasts and forecast scenarios can be easily identified by the icon next to their names.
- A green check mark indicates that the forecast results have been published to the downstream measures.
- Circular arrows indicate that the forecast was created using the forecast scenario option and has not been published to the downstream measures.
Forecast method: The forecast method is selected to create a forecast run. You can choose the forecast method or select the best model, and the forecast engine will choose the best-fit forecast method based on the historical data of the planning item.
Hierarchy: The hierarchy columns display the product, customer, location, and source hierarchy levels chosen while creating a forecast. For example, if the hierarchy selected during forecast creation is Family: Customer: Location-All: Source-All, the forecast list screen will display this exact hierarchy.
Time period: The selected history and forecast time range for the forecast job will be displayed here.
Last run status:
Not started: When the forecast run is created, its initial status will be "Not Started."
Running: Once the application picks up the forecast run, the status will become running.
View results: Once the forecast is generated, the status changes to "view results." By clicking "view results," you can access error metrics for the forecast.
Failed: If the forecast run fails for any reason, the forecast run status will be updated to failed.
Last Run Time – The date & timestamp of the previous forecast run
Actions
Run: After editing the forecast job, click the run button to update the forest job's configuration.
More:

Edit: To edit any forecast jobs, click the edit button.
Rename: To rename any of the existing forecast jobs, click on the More and select the Rename option. This will open a pop-up where you can change the name as shown below. Click the save button once the forecast name has been updated. This will change the name of the forecast immediately without re-running the forecast job.

Delete: The created forecast can be deleted by clicking the delete button.
Preferences
The Preferences section in Forecast Management stores and displays forecast parameters for creating forecasts. These preferences help standardize forecasting by predefining key parameters such as forecast methods, hierarchies, and periods. So, you do need to create a forecast from scratch.
Key Features of Preferences:
View Existing preferences– All previously created forecast preferences will be listed here for easy selection and reuse.
Create New preferences – Users can create new forecast preferences if needed, ensuring flexibility in forecast configuration.
This feature simplifies forecast creation, allowing users to apply predefined configurations and streamline the forecasting process quickly.
Create forecast: Click this button to create a new forecast.
Refresh data: Click this button to update the latest status of the forecast runs.
Compare versions
The Compare Versions feature allows users to analyze different forecast scenarios side by side. When a forecast is edited and executed using the "Run as Scenario" option, the modified forecast is stored as a scenario under the original forecast run.
Key Features of Compare Versions:
Scenario Comparison – Users can compare two or more forecast runs, including the original and scenario forecasts.
Was this article helpful?
That’s Great!
Thank you for your feedback
Sorry! We couldn't be helpful
Thank you for your feedback
Feedback sent
We appreciate your effort and will try to fix the article